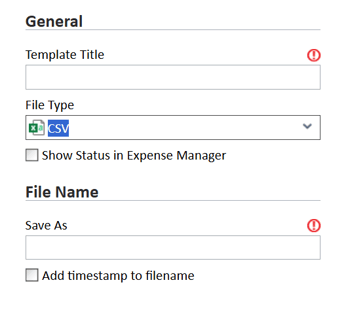
All CSV Output Files should be created using descriptive file names. To maintain consistency, follow a naming convention for all file names. Enter the file name into the Save As field. If you want to add a timestamp automatically to each generated file, check the box labeled Add timestamp to filename.

In the Filter Data section, you can choose to filter the output data based on the following criteria:
- Currency
- Payment Type
- GL Code or
- Any other User Defined Fields you have configured.
If you want the file to be sent automatically whenever a new batch is processed, check the box labeled Send Automatically.
Column Mapping for CSV Files
The CSV file type allows you to map columns to match your specific system requirements.

Under the Columns tab of the Output File Editor, enter the:
- Content Type: Either Line Item (for detailed item information) or User (for employee totals used in Payroll outputs.
- Include the Header: Optionally with the checkbox.
- File Type: Either CSV, Excel or JSON file format.
Steps to Manage Columns
- Open the Automation Manager Module
Navigate to the Automation Manager module from the top navigation bar.
Note: If you do not see it in the top menu, check under the More menu located in the upper right corner of your screen.
- Access the Add New File Option
From the Output Files navigation menu on the left side of the screen, select Add New File.
- Open the Output File Editor
This will open the Output File Editor window.
- Set the File Type to CSV
In the General section, select CSV from the File Type dropdown menu.
- Select the Columns Tab
Navigate to the Columns tab at the top of the window. From the Columns tab, you can add the column name by clicking the Add button to select available fields for mapping.
- Delete a Column
You can delete a Column, if necessary, by selecting the column and clicking the Delete button.
- Edit a Column
If the fields do not match your system exactly, click the Edit button to enter the correct information.
While editing, you can choose to Group rows by this column by checking the box.
- Reorder Columns
To adjust the order of the columns, use the Move Up or Move Down buttons to fit your system’s format.
Common Field Requirements by System
Amex Card Remittance (CAD)
- Load Number
- Book Number
- CID
ACH Transfer
- Merchant ID
- Secure Transaction Key
- Password
HSB Remittance
- Transit Number
- Account Number
- Account Name
TransactionPro
- Track credits checkbox
- Entity
- Account
- Class
- Include Category Column
NACHA File
- Bank Name
- Bank Routing Number
- Company Name
- Company Identifier
- Add balancing entry
- Notify Users
QuickBooks Online
- Entry Type – could be Billing, Expense Reports and Journal Entries.
- Account Name
- Bill Vendor
- Transaction Date
- Description
- Memo
- Class Name
- Notify Users
Sage 500 (CA version)
- Entry Type
- Account Name
- Source Name
- Date
Xero
- Entry Type
Net Suite
- Entry Type
Viewpoint Spectrum
- Entry Type
EFT 80 byte file
- Originator Name (Company Name)
- Originator ID
- Institution ID
- Transit Number
- Account Number
- Manual Due Date (DDMMYY)