Importing transactions automates the data entry process, saving you time and reducing manual effort. This is particularly beneficial when dealing with a large volume of expenses. Importing transactions ensures that data is consistent in format and structure, making it easier to analyze, categorize, and report on expenses.
You can consolidate Transactions from multiple sources (e.g., credit cards, bank accounts) into a single hub, providing a unified view of all expenses.
From the Import Transaction menu option you can set up direct feed integration, the corporate card feeds will be coming directly into the imported transactions list from the card service provider. Submitters can then match them with the existing expenses or create new expenses from the card transactions.
The ExpensePoint™ system allows you to auto create Expense Reports based on static your cutoff dates of the credit card statements. If your statement dates change from month to month, contact us to identify a workaround.
The system will add these transaction expenses to the report automatically. All you'd have to do is categorize and add the receipts. If you have the SIC mapping set up, the system can even auto categorize the expenses based on the SIC mapping, but this works only if the category digits stay same all the time. These 4 digits come from the statement.

Note: the 4 digits category code cannot be mapped to 2 categories, e.g. "Employee Meals" and "Meals and Entertainment Client" .
From the Tasks menu on the left side navigation, go to Import Transactions.
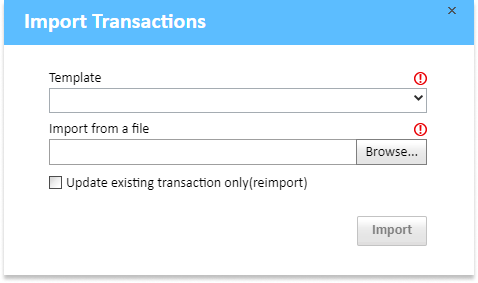
The Import Transactions screen will open to allow you to select the Template for your file import.
Note: You would need to have the template set up prior to importing transactions. Learn more about creating a template from this article.
Choose the Template, as this will “translate” the imported file into the proper format for the ExpensePoint™ system.
Then choose the file itself that you wish to import by clicking on the Browse option.
Note: The imported file needs to correspond to the template’s format. Also make sure the file is not already open on your desktop, as this will prevent the upload.
If you are reimporting a file, check the box next to Update existing transaction only(reimport).
Once the import is complete, you may check the results by going into the Expense Manager module, then to the Transaction option from the Entry Tasks navigation menu. The imported transactions should show up on the Transactions list.