The Vendors menu option is essential for maintaining accurate vendor records and streamlining expense tracking within your organization.
The ExpensePoint Vendors option allows you to manage your vendors or suppliers by expense category. You can associate expenses with specific vendors, making it easier to track and categorize expenditures. This helps with financial analysis and expense reporting.
To view or set up your vendors, go to the Vendors option from the Personal Settings navigation menu on the left side of the screen.

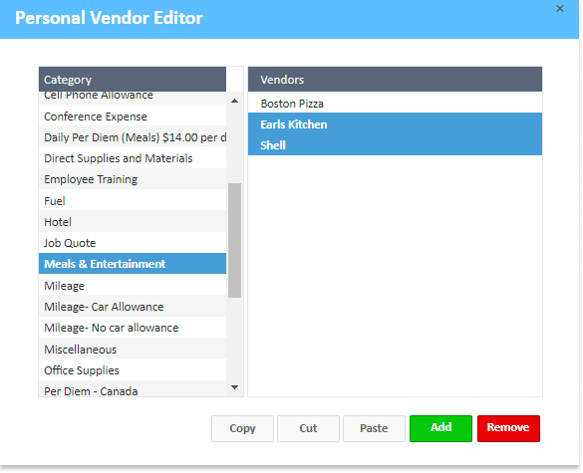
Clicking this will open the Personal Vendor Editor, displaying a list of categories and vendor options.

If you already have some vendors set up, the list will display them under the corresponding category. You will also have options available to Add a new vendor, Remove, Cut, Paste or Copy any of the existing vendor(s).
Add a New Vendor
To add a new vendor, go to the Vendors option from the Personal Settings navigation menu under the Profile module.

From the Personal Vendor Editor window, click on the category where you want to add the vendor, then click the Add button.

A new window will appear for you to Add Personal Vendor.
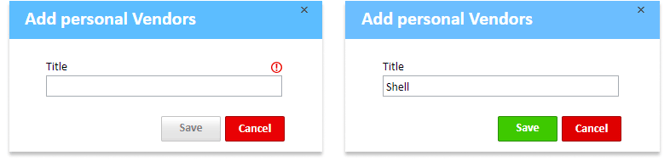
Note: Fields marked with this ![]() icon cannot be left empty. They require a text input before they can be saved.
icon cannot be left empty. They require a text input before they can be saved.
Enter the name of the Vendor in the Title field and Save it. The newly added vendor will then appear in your vendor list.

Duplicate or Copy Vendor
If you need to track expenses for the same vendor across different categories (e.g., marketing expenses, IT expenses), duplicating the vendor and associating each copy with a specific category can help.
To duplicate a vendor, go to the Vendors option from the Personal Settings navigation menu under the Profile module.

In the Personal Vendor Editor, select the vendor’s current category. The available vendors are displayed on the right side of the screen. Select the desired vendor you wish to duplicate, then click on Copy.

Go to the category where you want to duplicate the selected vendor. Then, click Paste to finalize the duplication.

The duplicated vendor will now appear in both categories.

Move Vendor
If you’d like to move a vendor from one category to another, select the category and the vendor you wish to move from the Personal Vendor Editor window from the Vendors menu option.

Click on the Cut button, then select the category where you want the vendor moved to.

Click Paste to complete the move. The Vendor will now be moved to this category and removed from the previous category.

Remove Vendor
To delete a Vendor from your vendors list, start by selecting the Vendors option from the Personal Settings navigation menu on the left side of the screen, then open the Personal Vendor Editor.
Next, select the category, then the vendor you wish to delete from the Vendors list.
Note: You can select multiple vendors by holding on CTRL+Click on the options.
After making your selection, click the Remove button to delete the selected vendor(s) from the list.
A confirmation window will appear asking you to confirm the deletion. Click Yes if you wish to proceed with the removal, or No to cancel this action.

Note: You cannot undo this action. You will need to create/add a new vendor if you decide you want the same vendor back on the list.